Rig Conductor user manual
Rig Conductor runs a heat-aggression recording from start to finish: record on the Motif rig, cut the video into one clip per arena, track the flies on Aoraki, score the behaviour, and copy the results to a USB disk. A second window, the training-data wizard, grows the labelled frames that teach the pose model and trains new models on Aoraki.
Every picture in this manual is a real window. The numbered orange circles show where to click; the list under each picture says what each number does. Example content (vials, a run on Aoraki, picked frames) was filled in for the pictures.
Before you start: Motif and the camera
Rig Conductor records through Motif, the loopbio recording software. Motif runs in the background from the moment the PC starts, but the camera must be connected in Motif before you open Rig Conductor. Do this first, every recording day.
Open Motif: press the Super key (or Show Applications, bottom left), type Motif and click the Motif icon (the loopbio logo). Motif opens in the web browser. (Motif (admin interface) is for repairs only.)
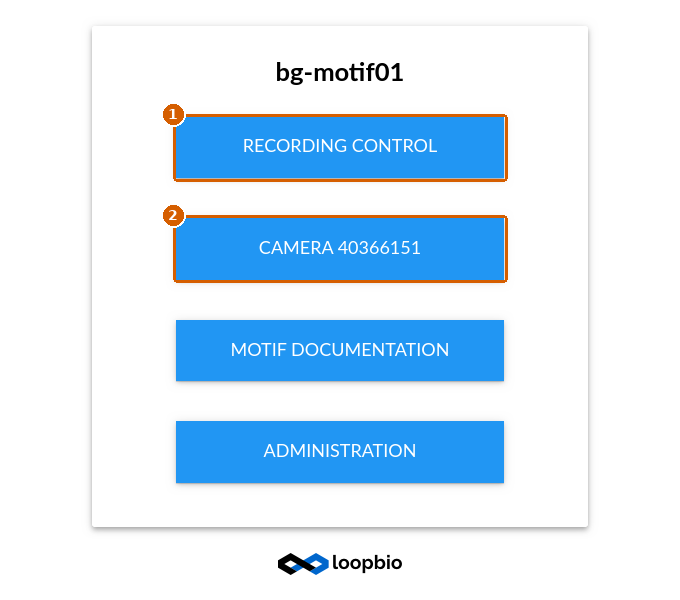
Recording Control: the cameras and whether they are connected.
Camera 40366151: the live image of the camera.
Click Recording Control:

The camera (its serial number): click it to see the live image.
State of the camera, for example Recording finished or Idle.
Connect: press it when the camera is not connected. When it is connected, Connect is grey and Disconnect is blue, as in the picture. Do not press Disconnect.
Then open the live image (Camera 40366151 on the start page) and check that all arenas are in view and lit. Now start Rig Conductor. On its first page, Check rig readiness must show the camera line as OK; if it does not, go back to Motif and connect the camera.
Starting the programs
What |
Desktop icon |
Command |
|---|---|---|
Record and analyse |
Rig Conductor |
|
Labels and training |
Rig Conductor — training data |
|
Relay on a networked PC |
(none) |
|
You can also open the training-data wizard from the main wizard with the Training data… button at the bottom.
Help (bottom left on every page, or F1) opens this manual in its own window, at the section about the page you are on. It has a contents list and a search box (Ctrl+F); you can keep it open beside the wizard.
A recording day goes through six pages: Setup → Animals → Record → Cut & check → Analyse → Deliver. Press Next to go on. Every step is saved, so you can close the program and pick up the same recording later (Setup page, Existing recording).
1 · Setup
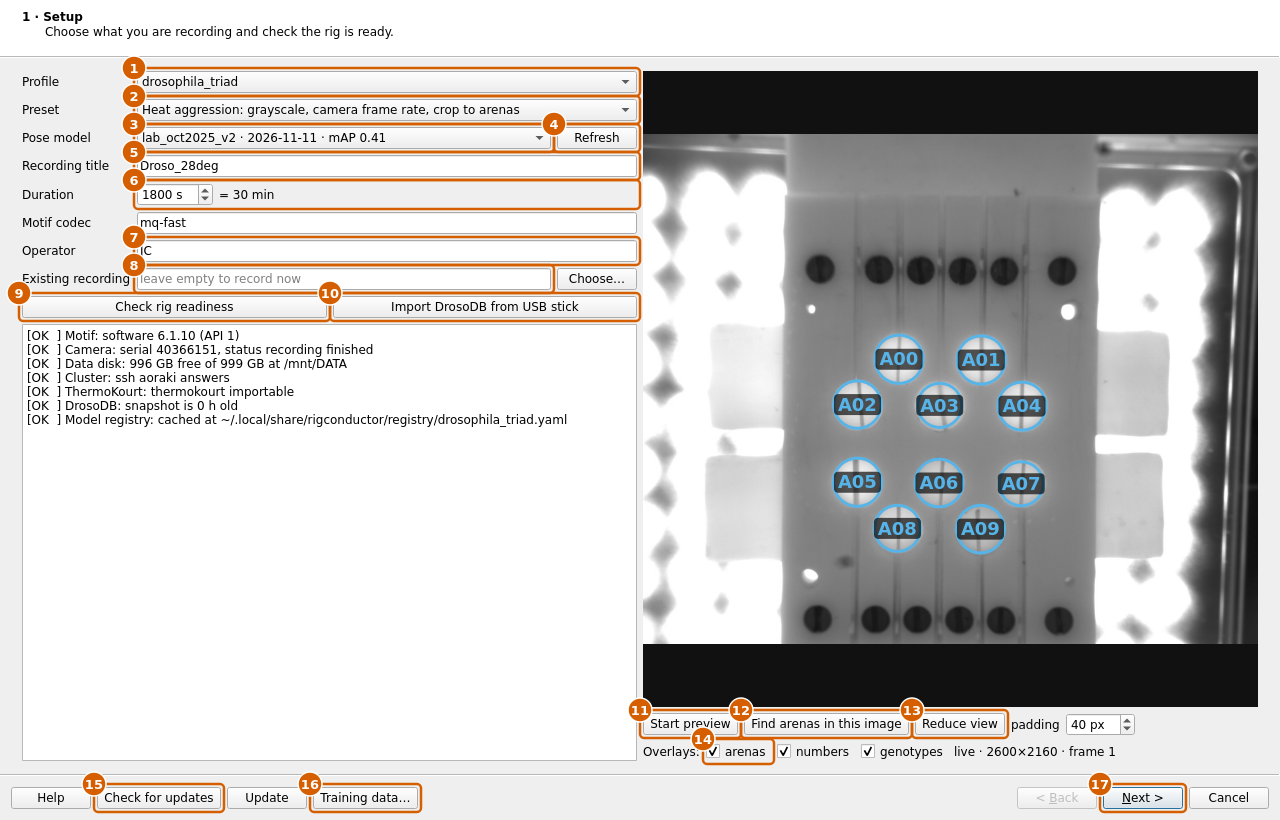
Profile: what is in the rig.
drosophila_triadis the fly aggression rig (10 arenas, 2 males and a decapitated female each).Preset: the kind of experiment. It sets grayscale, frame rate and whether the recording is cropped to the arenas afterwards.
Pose model: the SLEAP model Aoraki will use. The default model is chosen for you. The camera is checked against the model straight away and the result appears in the report box.
Refresh: fetches the newest model list from Aoraki.
Recording title: becomes the start of the recording’s folder name, for example
Droso_28deg.Duration: how long to record, in seconds (the minutes are shown next to it).
Operator: your initials.
Existing recording: leave this empty to record now. To analyse a recording that already exists, press Choose… and pick its folder. If the Conductor made that recording, all its settings and vials come back and the finished steps are skipped.
Check rig readiness: checks Motif, the camera, free disk space, the connection to Aoraki, ThermoKourt, the DrosoDB copy and the model list. Every line should say
[OK ].Import DrosoDB from USB stick: brings in the newest vial list. On the tablet run DrosoDB → USB stick first, then plug the stick in here.
Start preview: shows the live camera picture.
Find arenas in this image: looks for the arenas in the live picture. Use it to check that the plate sits where it should.
Reduce view: shows only the area around the arenas. padding is the margin around them, in camera pixels; the same margin is used when the recording is cropped later.
Overlays: switch the arena circles, the arena numbers and the genotypes on the picture on or off.
Check for updates shows whether a newer version of the Conductor or ThermoKourt exists; Update (right next to it) installs it. Restart the Conductor afterwards.
Training data… opens the training-data wizard (see below).
Next: checks the camera against the model once more. If something does not fit, a box offers a fix, for example Convert to grayscale or Set camera to 69 fps.
2 · Animals
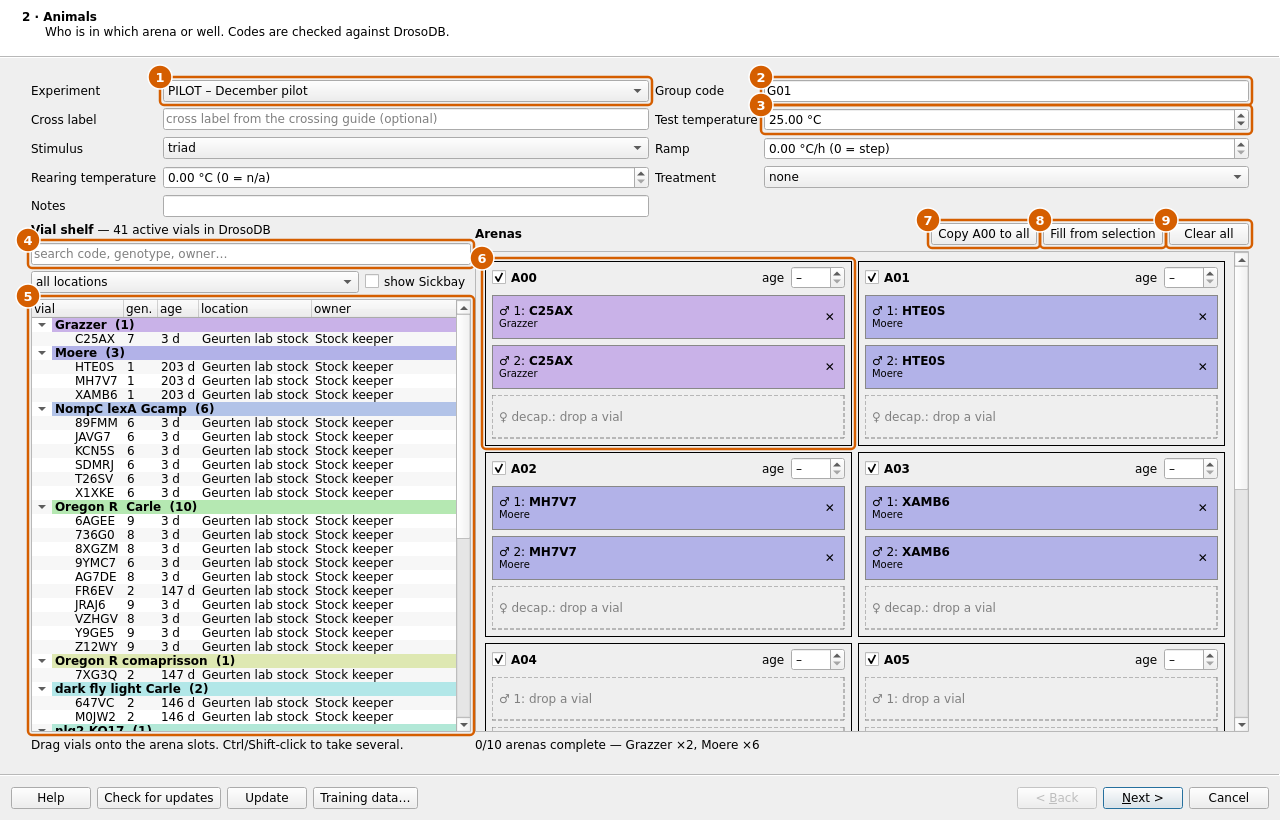
Experiment: the experiment this recording belongs to.
Group code: the coded group, for example
G01. Fill in Cross label, Stimulus, Ramp, Rearing temperature, Treatment and Notes where they apply.Test temperature: the temperature during the test.
Search: type a vial code, genotype or owner to find a vial.
Vial shelf: all active vials from DrosoDB, grouped by genotype. Drag a vial onto an arena slot. Ctrl-click or Shift-click to drag several at once. show Sickbay also lists the vials in the Sickbay (hidden otherwise).
Arena card: one card per arena. The tick says the arena is used. Drop a vial on a male slot; one vial fills both male slots. ✕ empties a slot, a double-click lets you type a code by hand, age is the age in days.
Copy A00 to all: gives every ticked arena the vials of arena A00.
Fill from selection: shares the vials selected on the shelf over the ticked arenas, in turn.
Clear all: empties every arena.
The line under the arenas says how many arenas are complete. Next refuses to go on while something required is missing and says what it is.
3 · Record
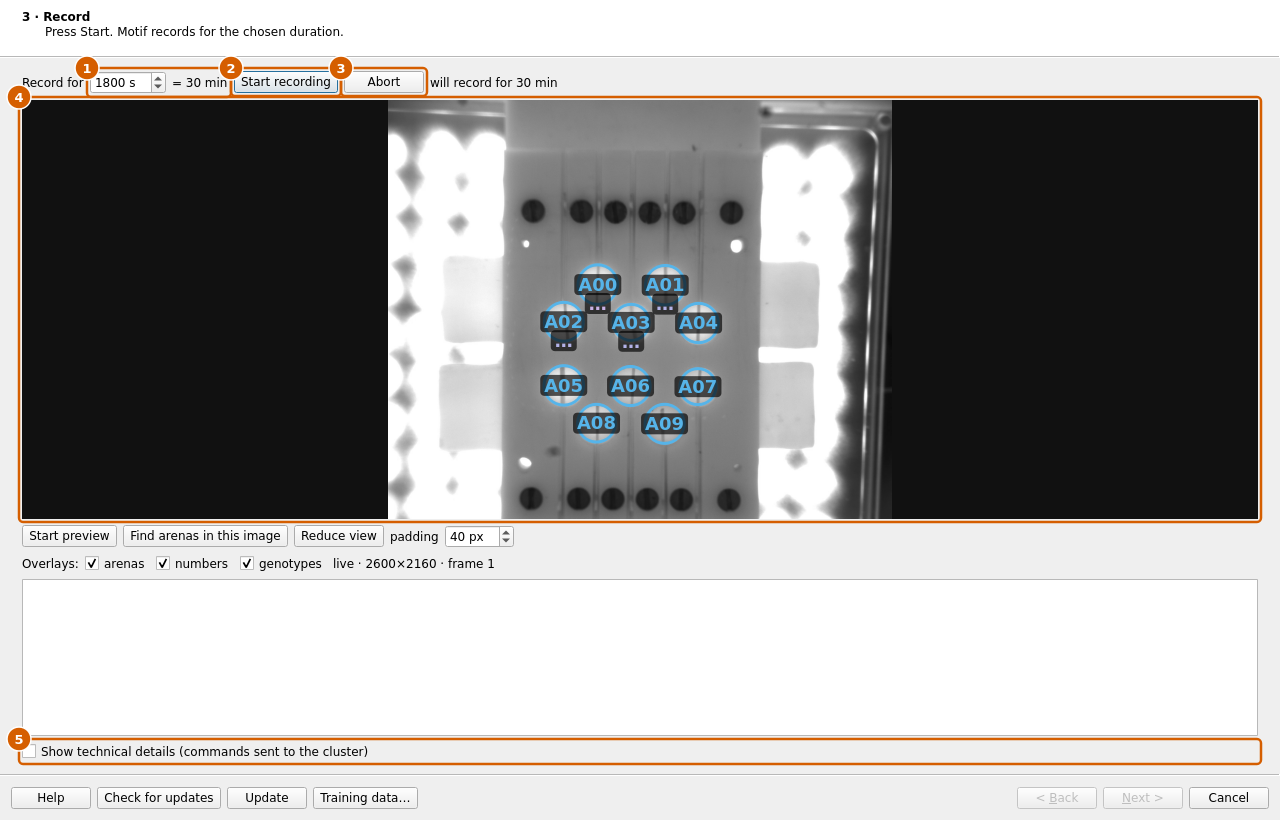
Record for: the duration again; change it here if needed.
Start recording: Motif starts recording. The line next to the buttons counts the time.
Abort: stops the recording early.
Live preview: starts by itself, with the arenas and genotypes drawn on.
Show technical details (commands sent to the cluster): also shows the commands sent to Motif and Aoraki in the log (for troubleshooting).
Next becomes available when the recording has finished.
4 · Cut & check
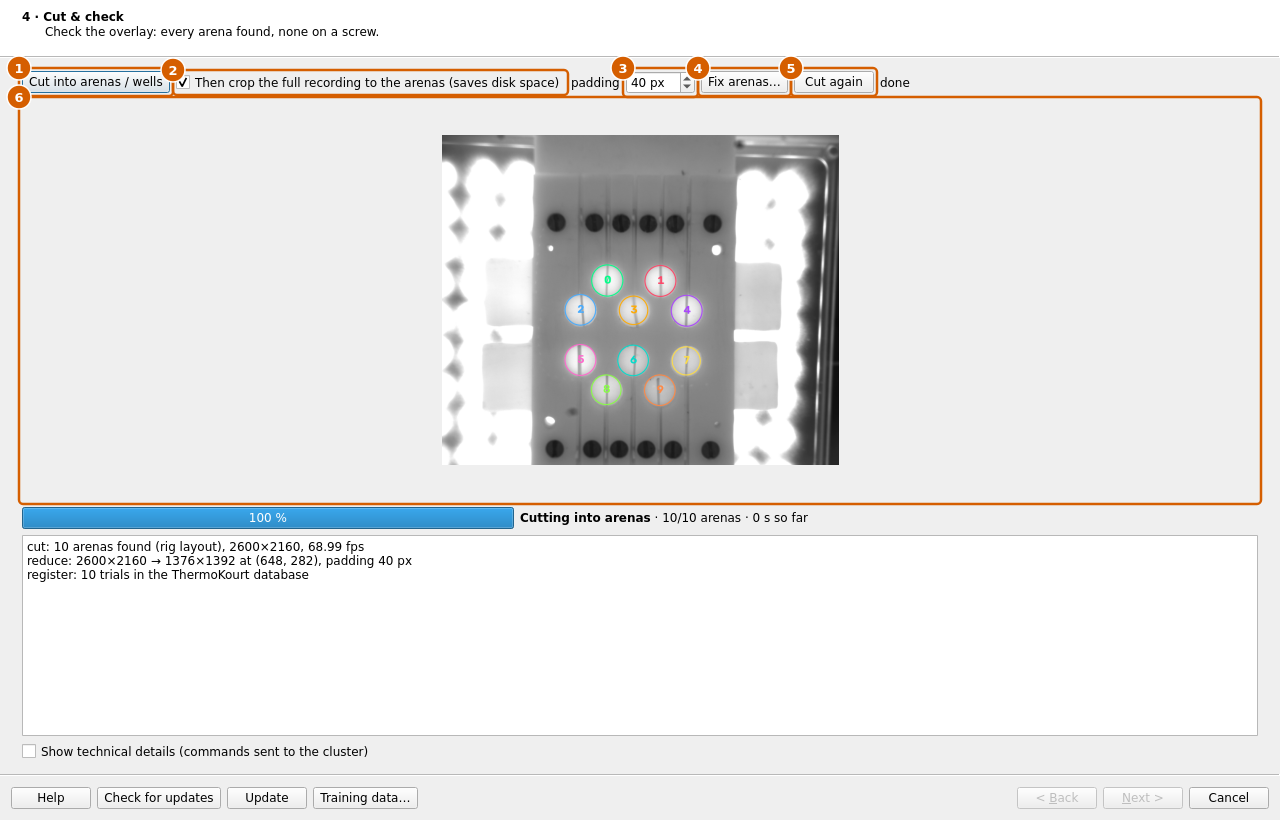
Cut into arenas / wells: cuts the recording into one clip per arena and registers the trials in the ThermoKourt database. The bar shows the progress.
Then crop the full recording to the arenas (saves disk space): afterwards the full video is replaced by a copy cropped to the arenas. This saves a lot of disk space. The cropped copy is checked frame by frame before the full video is deleted.
padding: the margin kept around the arenas when cropping.
Fix arenas…: opens the arena editor (next section) when an arena was missed or sits on a screw.
Cut again: throws the clips away and cuts again (the old clips are kept in a
clips.old-…folder).Arena overlay: check it. Every arena must have a circle and number, and no circle may sit on a screw.
Fix arenas
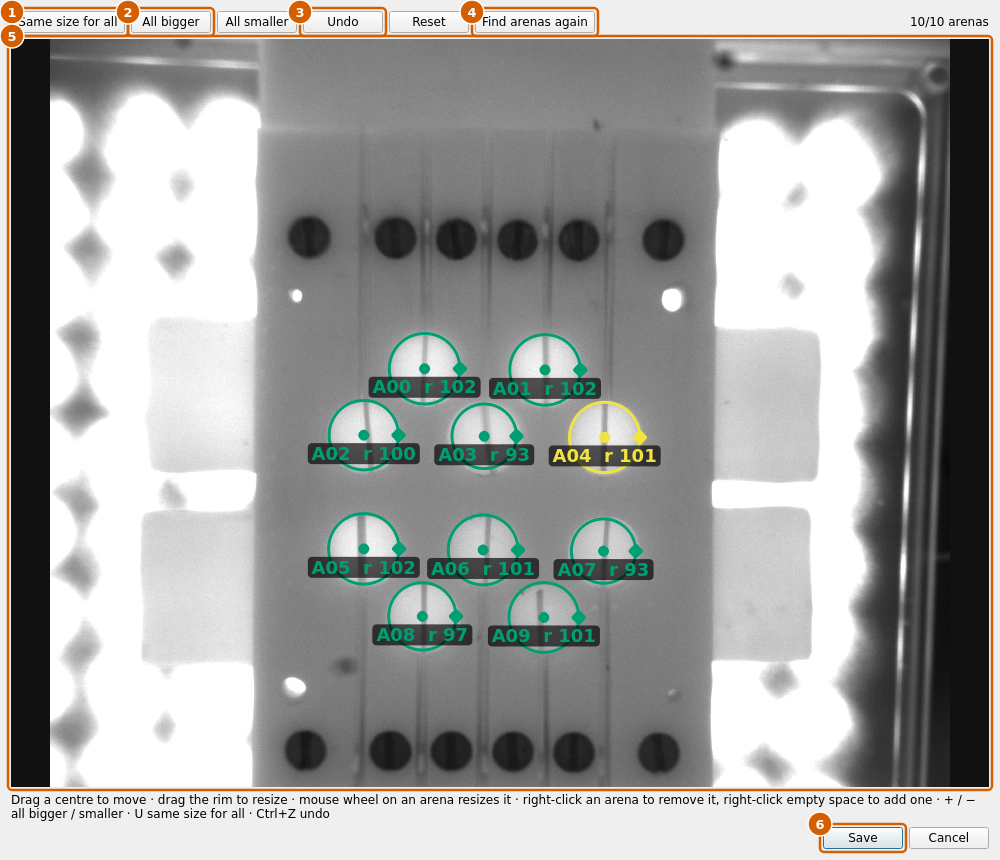
Same size for all: gives every circle the median size.
All bigger / All smaller: grows or shrinks every circle a little.
Undo / Reset: takes back the last change / goes back to the circles you started with.
Find arenas again: detects the arenas on this frame again.
The circles: drag a centre to move a circle, drag the rim to resize it, use the mouse wheel over a circle to resize it. Right-click a circle to remove it; right-click empty space to add one. Keys: +/− all bigger/smaller, U same size, Ctrl+Z undo. The selected circle is yellow.
Save: keeps the circles. The Conductor then asks whether to cut the recording again with them.
The saved circles also become the rig’s layout for the next recording.
5 · Analyse
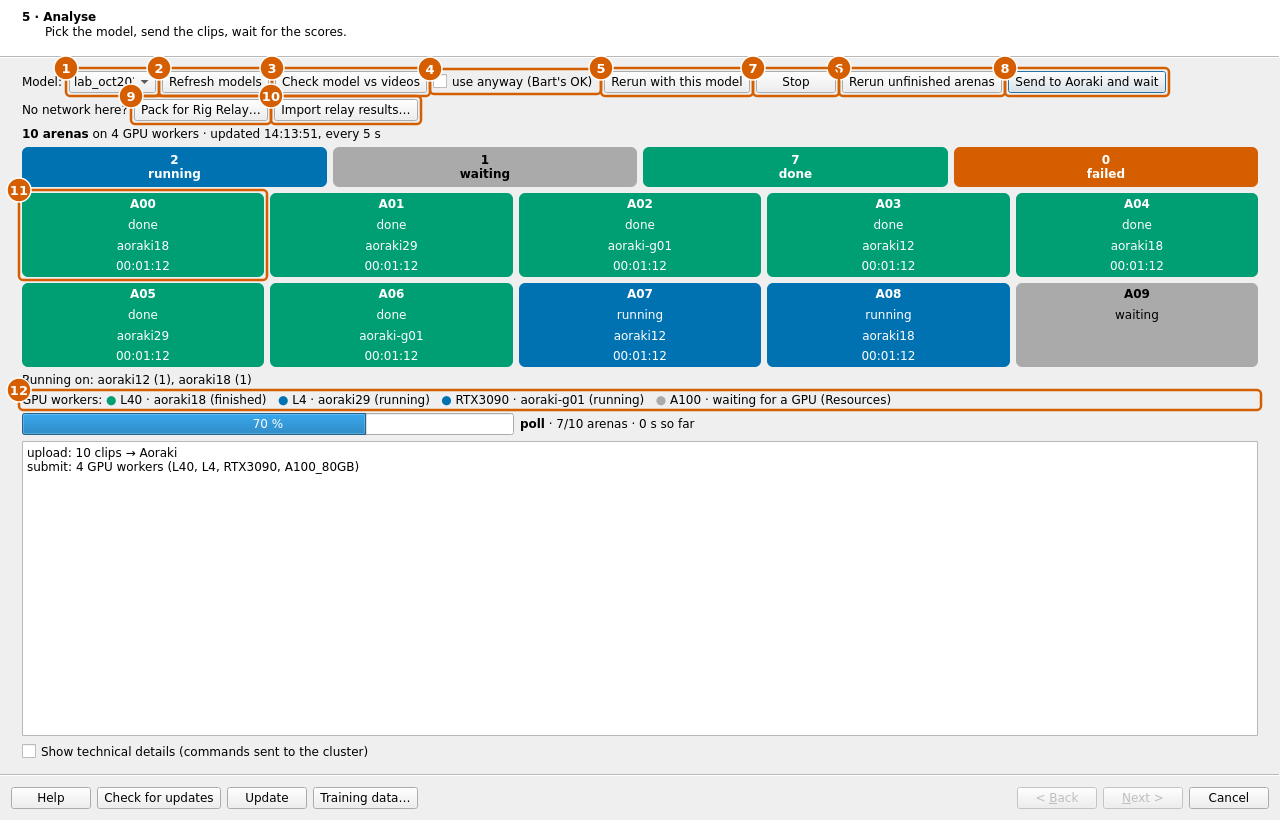
Model: the pose model for this recording.
Refresh models: fetches the newest model list from Aoraki.
Check model vs videos: checks that the clips suit the model (colour, frame rate, size).
use anyway (Bart’s OK): sends the clips even if that check failed. Only with Bart’s OK.
Rerun with this model: analyses the recording again with the model chosen in 1. The earlier poses are kept in an archive folder; the scores are replaced.
Rerun unfinished arenas: sends only the arenas that have no poses yet.
Stop: cancels this run on Aoraki. Finished arenas are kept.
Send to Aoraki and wait: uploads the clips, tracks the flies on the GPUs, fetches the poses and scores the behaviour. You can watch it here.
Pack for Rig Relay…: for a rig without network. Writes a job package to a USB stick (see Rig Relay).
Import relay results…: reads the results the relay wrote back to the stick. Then press Send to Aoraki and wait to score them.
Arena tile: one tile per arena: blue running, grey waiting, green done, orange failed, with the computer and the time. Click a tile to see the last lines of that arena’s log on Aoraki (picture below).
GPU workers: the graphics cards working on this run. A worker that waits says why (for example Resources: all cards of that kind are busy).
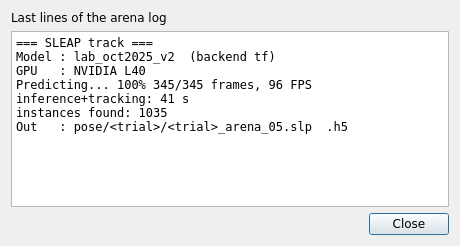
Aoraki tries a failed arena up to 3 times before it gives up. Several kinds of GPU are used at once; the run is done when every tile is green.
6 · Deliver
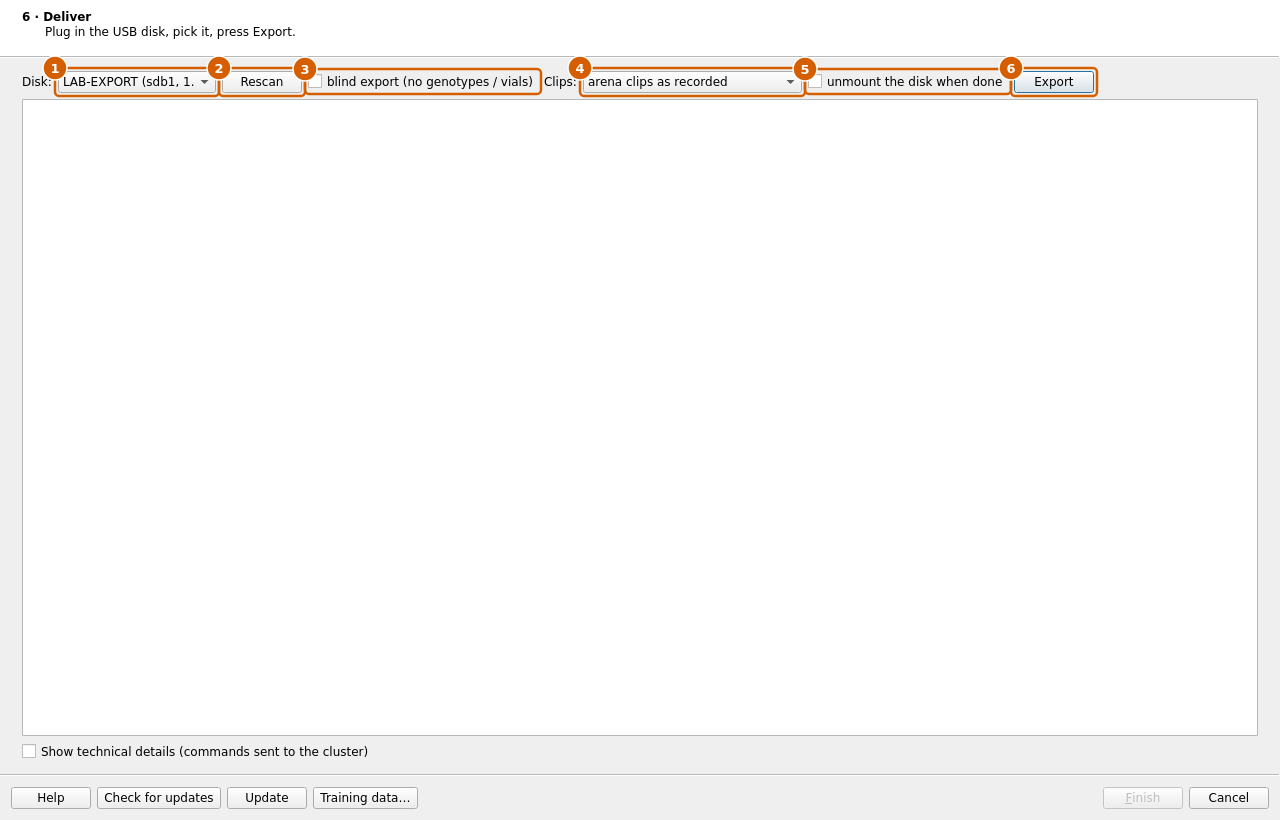
Disk: the USB disk to copy the results to. Choose … a folder instead to write to a folder.
Rescan: looks again after you plugged a disk in.
blind export (no genotypes / vials): leaves out genotypes and vial codes, so whoever scores the videos does not know the groups.
Clips: which videos go along: none, the arena clips as recorded, clips with the tracked skeletons, with the scored events, or both.
unmount the disk when done: the disk can be pulled out straight after.
Export: copies everything.
Rig Relay (a rig without network)
When the rig PC cannot reach Aoraki, a USB stick carries the work to a PC that can.
On the rig, Analyse page: Pack for Rig Relay… writes
<session>.job.zipto the stick.On the networked PC, open the Rig Relay window:
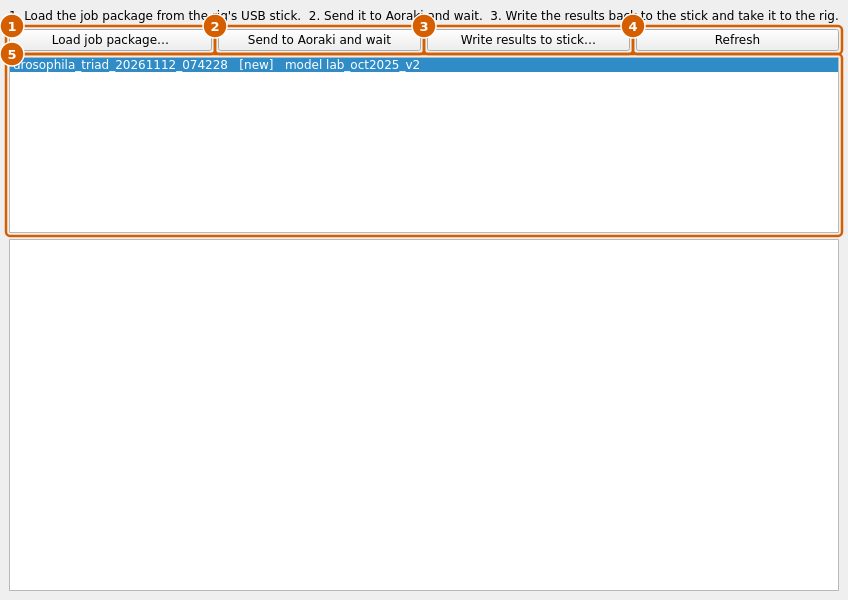
Load job package…: pick the
.job.zipon the stick.Send to Aoraki and wait: runs the Aoraki part for the session selected in the list.
Write results to stick…: writes
<session>.results.zipto the stick.Refresh: updates the list.
Sessions: each loaded job, with its state (new, at …, results ready) and model.
Back on the rig, Analyse page: Import relay results…, then Send to Aoraki and wait to score them.
Training-data wizard
The pose model learns from frames where people have placed every fly’s body points by hand. This wizard picks good frames to label, lets you label them in SLEAP (here or on any Linux PC from a USB stick), checks the labels when they come back, and trains a better model on Aoraki. All labelled frames live in a label set with numbered versions.
Start
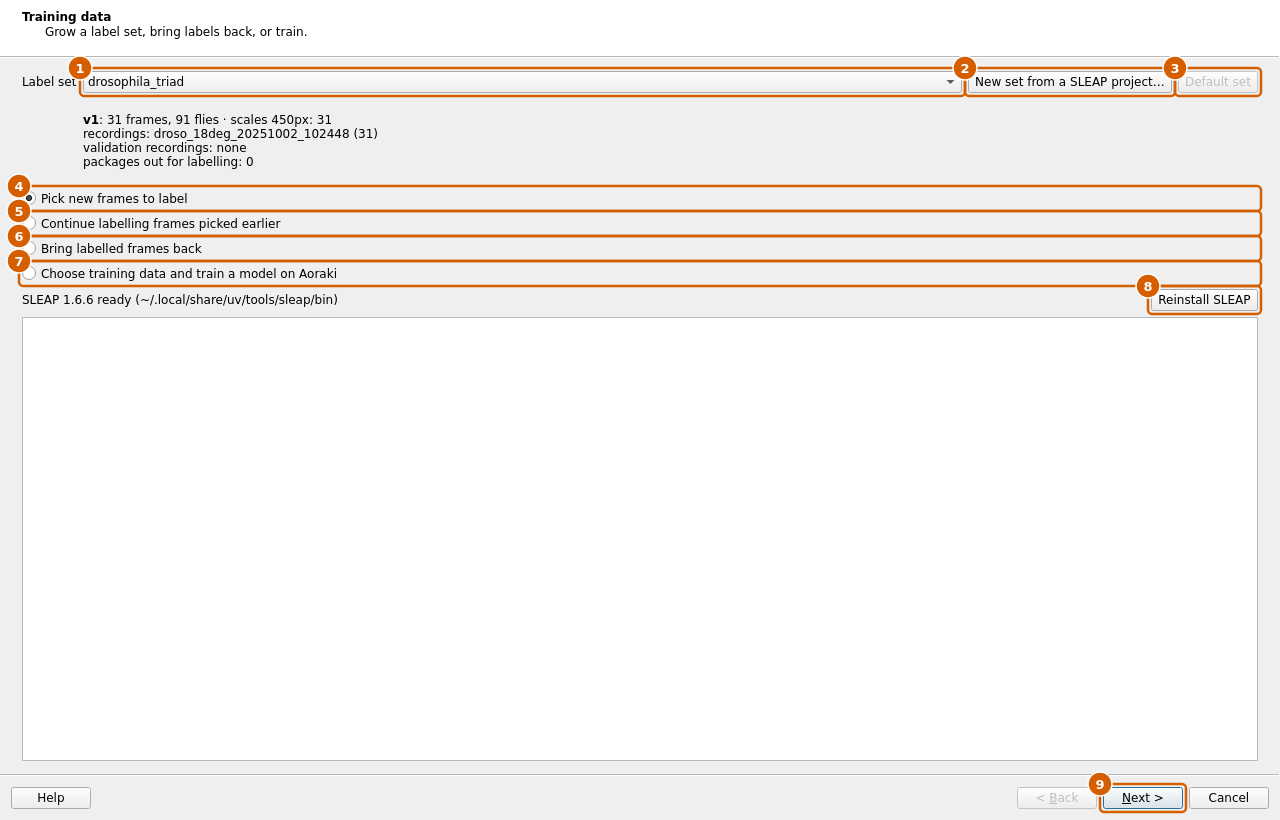
Label set: the set you work on. The lines under it show its frames, flies, camera scales, recordings and packages still out for labelling.
New set from a SLEAP project…: starts a new label set from a SLEAP file that is already labelled.
Make default: this set is picked automatically and is copied to Aoraki every 2 hours (the PC must stay logged in for that).
Pick new frames to label: go to Recordings.
Continue labelling frames picked earlier: go to Continue labelling.
Bring labelled frames back: go to Bring labelled frames back.
Choose training data and train a model on Aoraki: go to Training data.
Set up SLEAP: installs SLEAP for your user (no administrator needed). When SLEAP is installed, the line says SLEAP 1.6.6 ready and the button reads Reinstall SLEAP.
Next: opens the page chosen in 4–7.
Pick new frames: Recordings
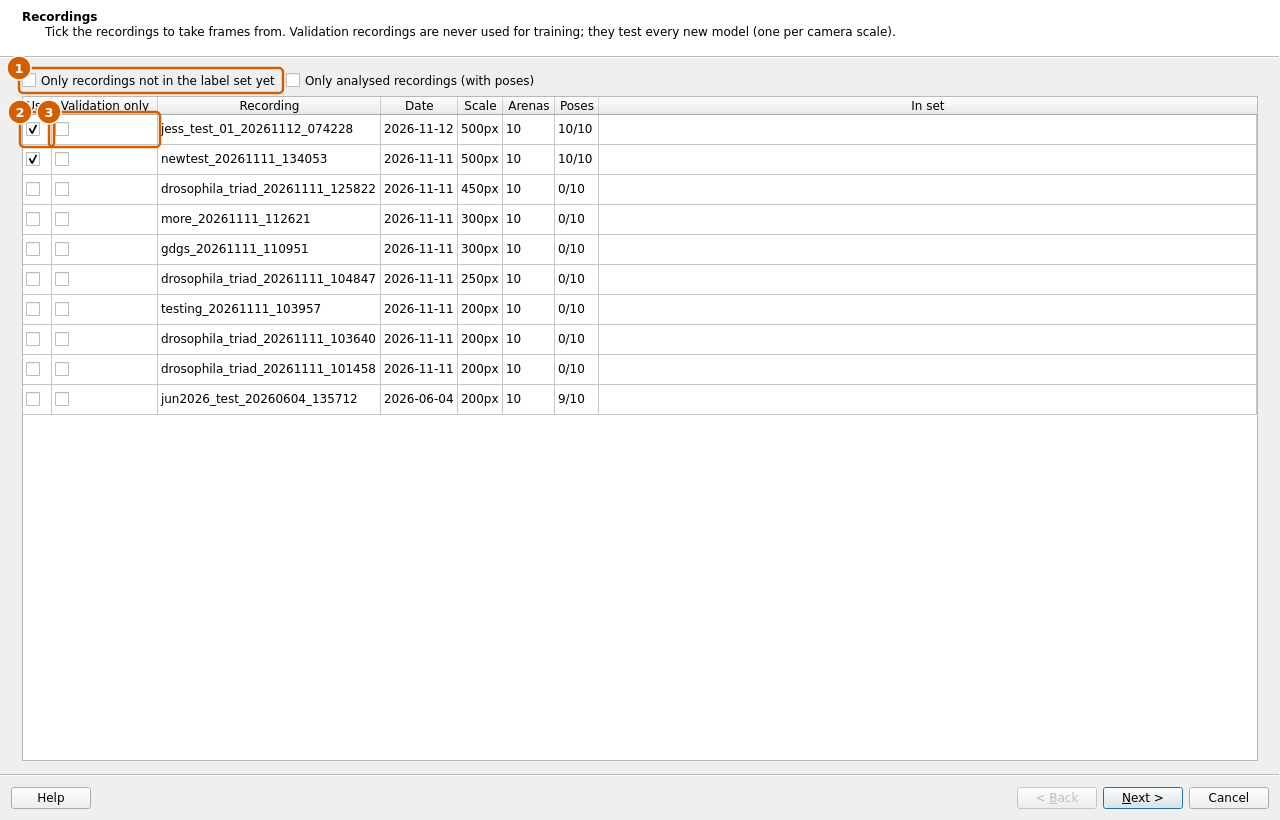
Filters: Only recordings not in the label set yet and Only analysed recordings (with poses).
Use: tick the recordings to take frames from.
Validation only: this recording is never trained on; it only tests models. Pick one per camera scale (the Scale column).
Pick new frames: Frames
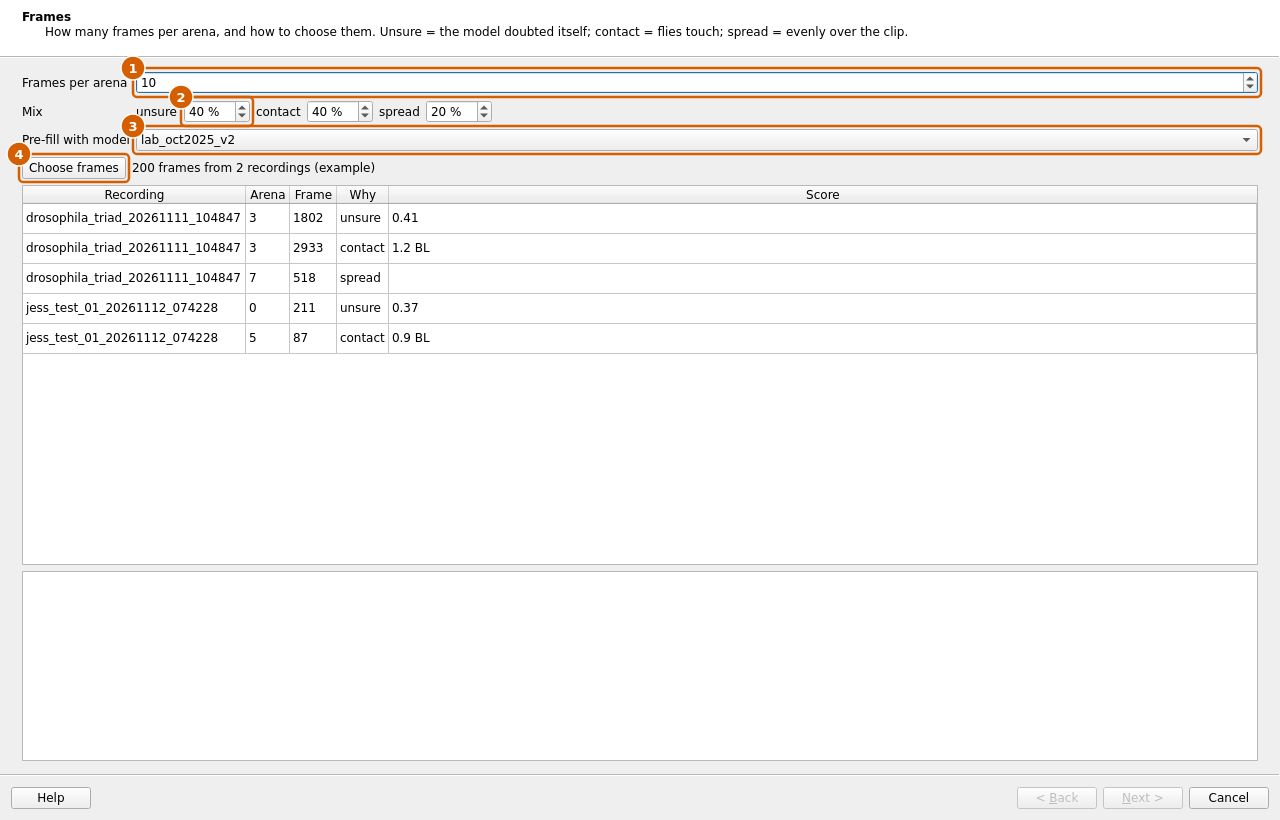
Frames per arena: how many frames to take from each arena.
Mix: how the frames are chosen. unsure: the model doubted itself; contact: the flies touch; spread: evenly over the clip. Frames are at least 2 s apart and never frames already labelled.
Pre-fill with model: a model places its guess on every frame, so you only correct it. none gives empty frames.
Choose frames: picks the frames and lists them (recording, arena, frame, why, score).
Pick new frames: Where to label
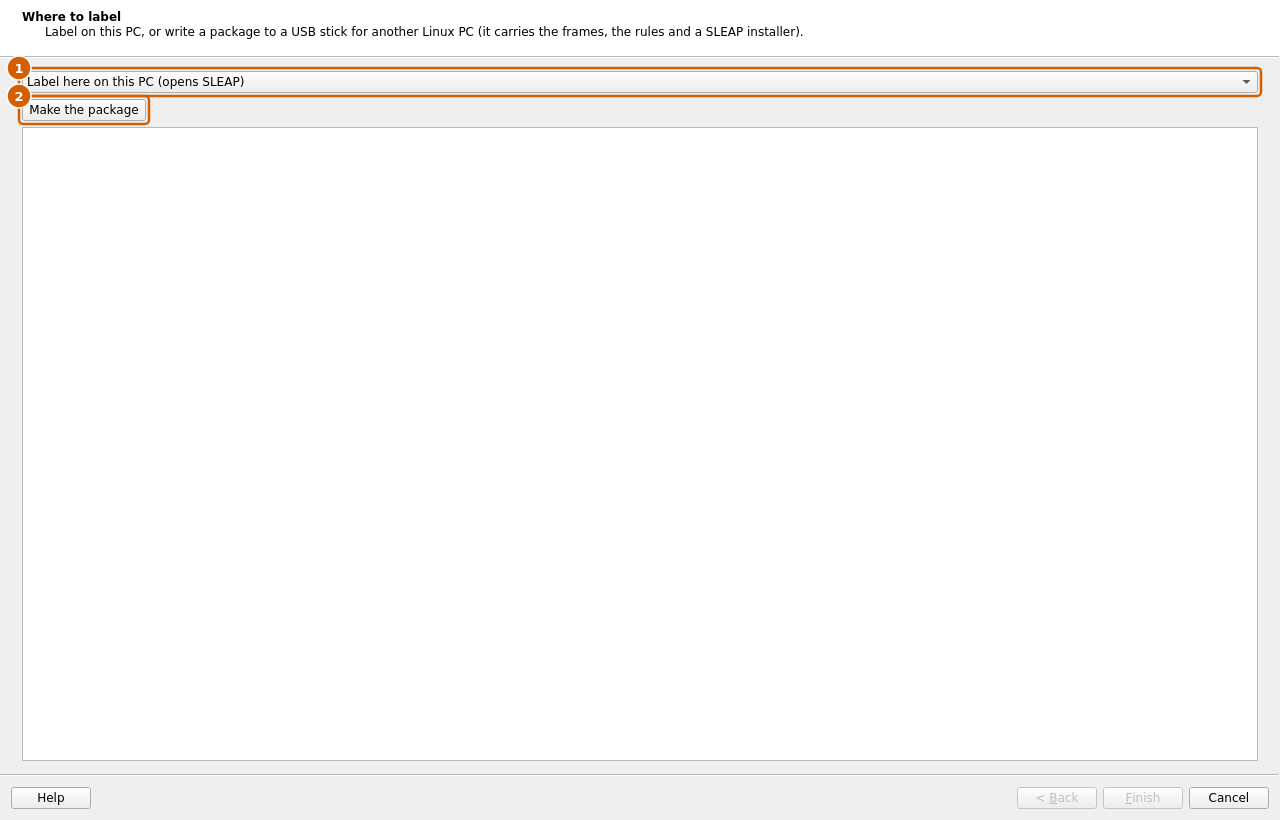
Where to label: Label here on this PC opens SLEAP; USB stick: … or A folder… writes a package.
Make the package: builds the package with the frames inside.
A package on a stick runs on any Linux PC: open the folder and run
bash label.sh. It installs SLEAP the first time, then opens the frames. Save
with Ctrl+S; the file on the stick is what comes back. RULES.md in the
package explains how to label.
Continue labelling
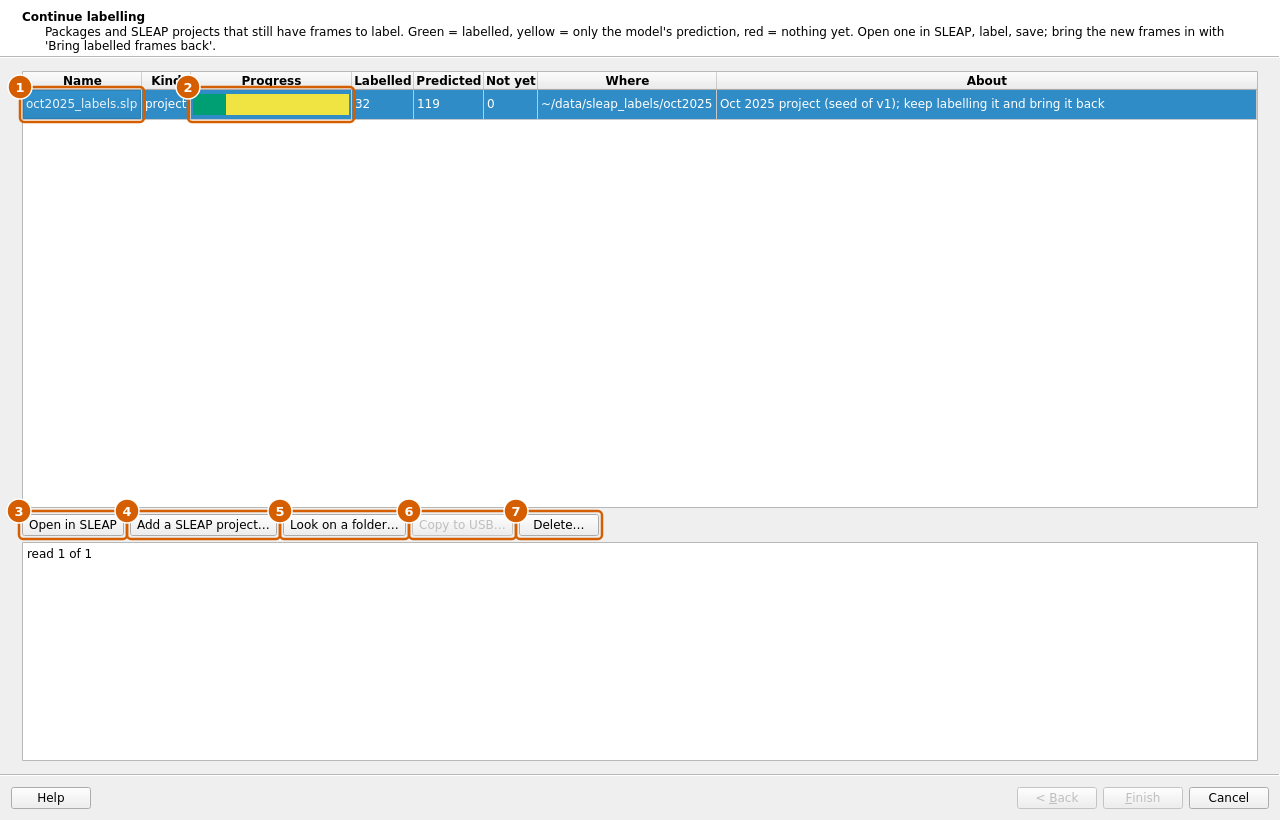
List: packages not brought back yet, and SLEAP projects labelled outside the wizard. Where says if it is on a stick or this PC.
Progress bar: green labelled, yellow only the model’s guess, red nothing yet.
Open in SLEAP: opens the selected one (double-click works too).
Add a SLEAP project…: adds a SLEAP file labelled outside the wizard.
Look on a folder…: finds packages in a folder that is not listed.
Copy to USB…: copies the selected package, with what is labelled so far, to a stick or folder. If the stick already has a copy, you are warned before it is replaced. (SLEAP projects cannot be copied: they need their videos.)
Delete…: deletes a package and its copies on plugged-in sticks after a warning that lists what would be lost. If frames are labelled, you must type the package name. For a SLEAP project it only takes it off the list.
Bring labelled frames back
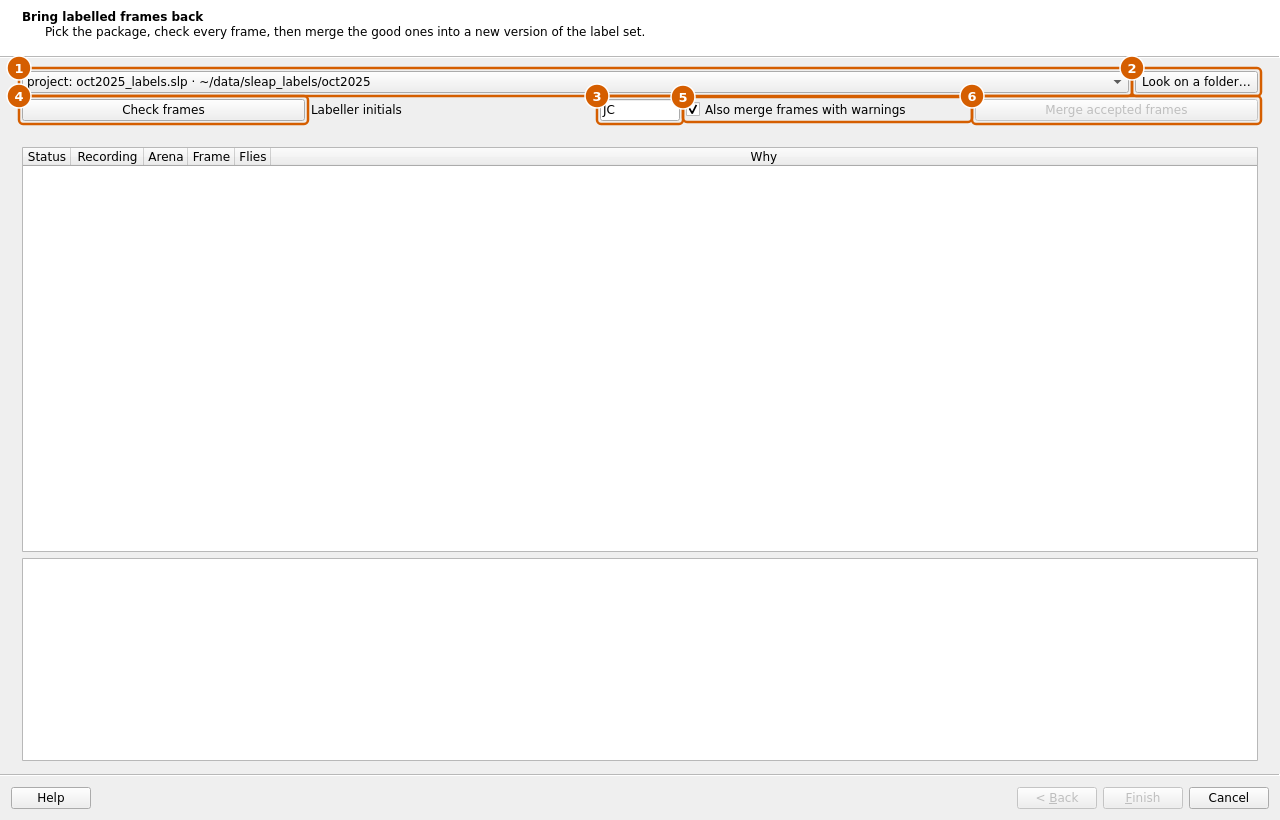
Package or project: what to take in. Packages on plugged-in sticks are listed by themselves.
Look on a folder…: finds a package somewhere else.
Labeller initials: who labelled the frames.
Check frames: checks every frame. Rejected frames are half-corrected, have the wrong number of flies, miss a thorax, have points off the image, or label one fly twice. The table says why for each frame.
Also merge frames with warnings: takes frames with only a warning too (for example the female head rule).
Merge accepted frames: adds the accepted frames to the label set as a new version. Frames already in the set are skipped.
Training data
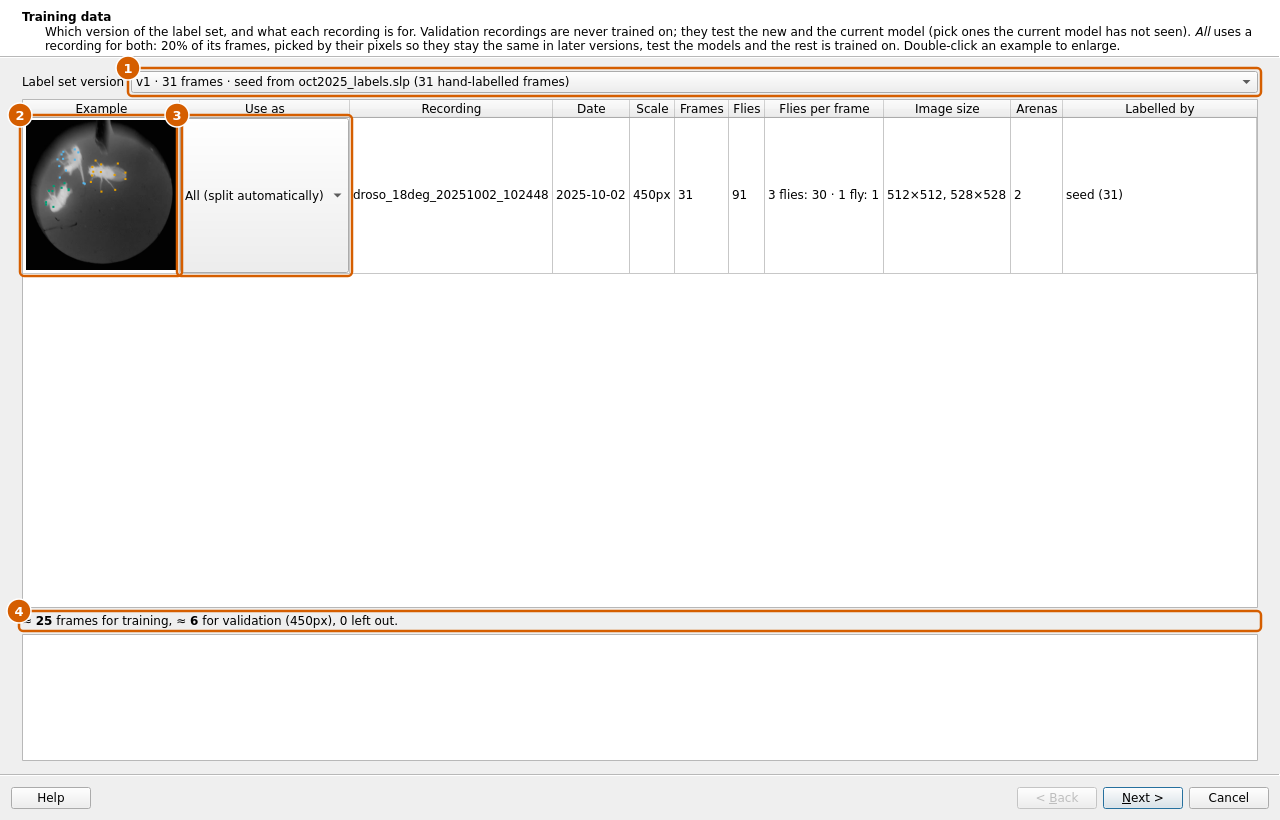
Label set version: which version to train on.
Example: one labelled frame of each recording. Double-click to enlarge it.
Use as: what each recording is for.
Training: trained on.
All (split automatically): 20 % of its frames test the models, the rest is trained on. The same frames stay test frames in later versions.
Validation: only tests the models (best: a recording the current model has never seen).
Leave out: not used.
Totals: frames for training and for validation. Next needs both.
The other columns show date, camera scale, frames, flies, flies per frame, image size, arenas and who labelled them.
Train on Aoraki
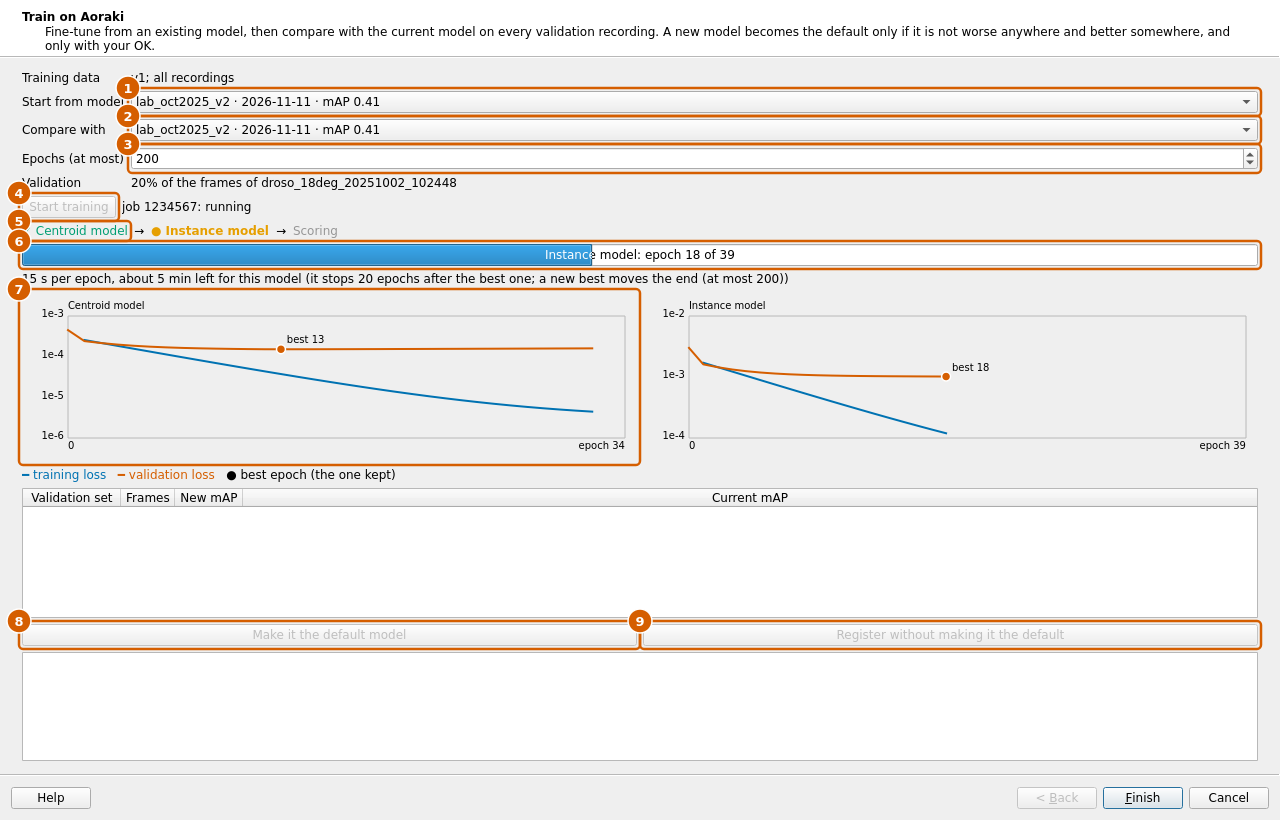
Start from model: the model the new one is trained from.
Compare with: the current model it must beat.
Epochs (at most): the longest training; it stops earlier when the model stops improving.
Start training: sends the frames to Aoraki and starts training. You can close the wizard; it picks the run up again when reopened.
Steps: Aoraki trains two models one after the other (Centroid model finds the flies, Instance model places the points), then scores the new and the current model. Green ✓ is done, orange ● is running.
Epoch bar: epochs done for the model in training, and about how long is left. Training stops 20 epochs after the best epoch, so the end moves back each time the model gets better (never past Epochs (at most)). The page checks Aoraki every minute.
Loss curves: one per model. Blue is the training loss, orange the validation loss, the dot the best epoch (the model that is kept). Both should go down. If the blue line keeps falling while the orange one stays flat, the model is learning the training frames by heart: label more frames.
Make it the default model: offered only when the new model is not worse than the current one on any validation set and better on at least one. The table above shows both models’ scores (mAP) per validation set.
Register without making it the default: keeps the model in the list without using it for new recordings.
Annotating Drosophila triads in SLEAP
This chapter is for the person who labels the frames. You get a package from the training-data wizard (on a USB stick or on this PC). Each frame shows one arena with 3 flies: two intact males and one decapitated female. You place 13 points on every fly. The pictures in this chapter are SLEAP 1.6 itself, opened on frames from the label set.
Opening the frames
On a stick: open the package folder and run bash label.sh. On this PC:
Label here on this PC or Open in SLEAP in the wizard. Both open SLEAP
with the frames of the package.
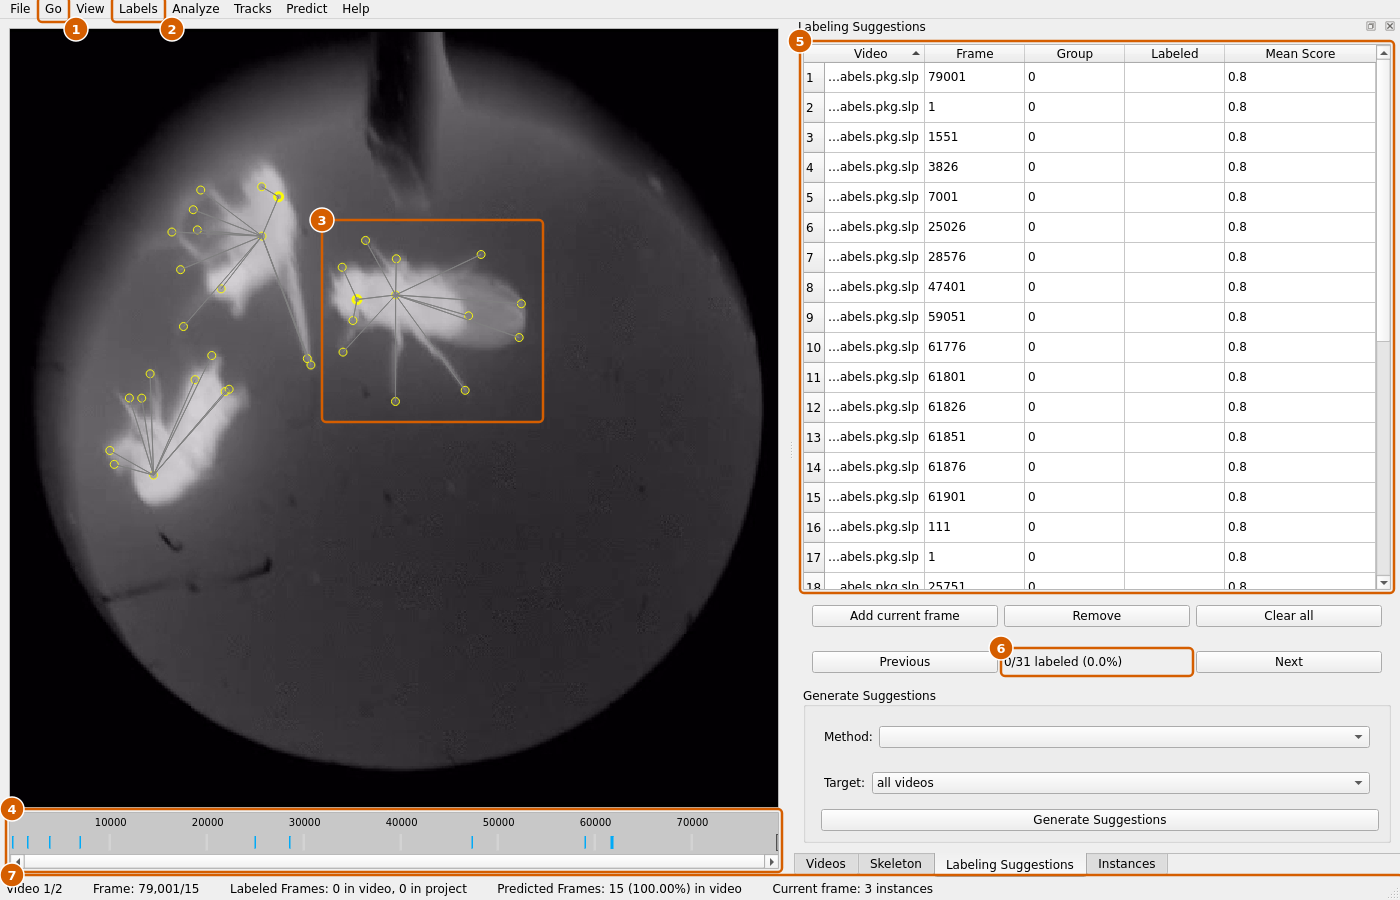
Go: Next Suggestion (Space) and Previous Suggestion (Shift+Space). This is how you move from frame to frame.
Labels: Add Instance (Ctrl+I) adds a fly; Delete Instance (Ctrl+Backspace) deletes the selected fly.
A fly guessed by the model. Guesses are drawn thin and yellow, without names. They are not labels yet.
Seek bar: the marks are the frames to label.
Labeling Suggestions tab: every row is one frame to label. Click a row to jump to it.
Previous / Next and the progress (0/31 labeled).
Status bar: frame number and how many flies are on it.
Do not use Generate Suggestions, Add current frame, Remove or Clear all: the wizard has already chosen the frames.
The 13 points
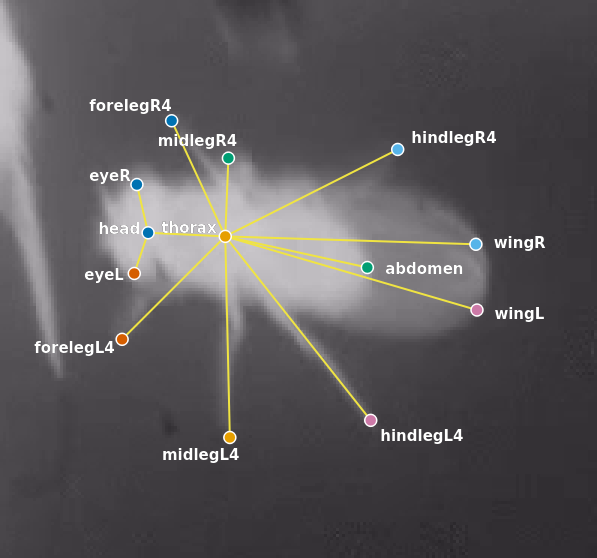
Point |
Where |
|---|---|
head |
middle of the head, between the eyes |
eyeL, eyeR |
the left and right eye |
thorax |
middle of the thorax. Every fly needs it; be precise. |
abdomen |
on the abdomen, towards its hind end (as in the picture) |
wingL, wingR |
the tip of the left and right wing |
forelegL4, forelegR4 |
the tip of the left and right front leg |
midlegL4, midlegR4 |
the tip of the left and right middle leg |
hindlegL4, hindlegR4 |
the tip of the left and right hind leg |
Left and right are always the fly’s own left and right. Do not go by which side of the screen the point is on. Look at where the head points.
Correcting a fly the model guessed
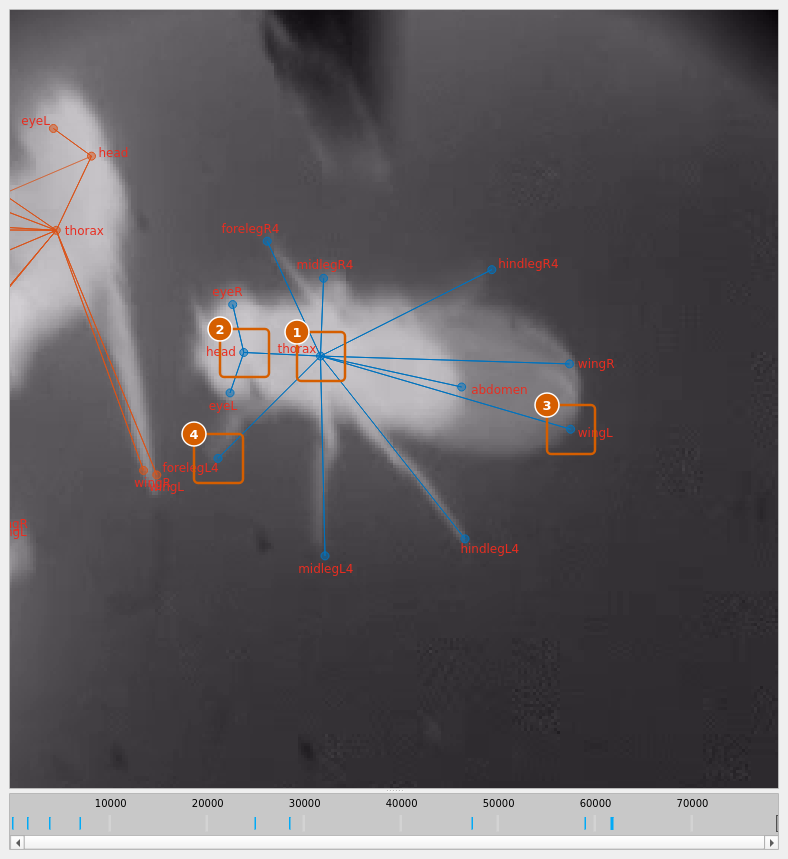
Press Space to go to the next frame to label.
Double-click a guessed fly. It becomes a labelled fly: coloured, with the name next to every point.
Drag every point that is wrong to the right place. Check all 13: the thorax (1), the head (2), the wing tips (3) and the leg tips (4).
A point you cannot see: right-click it. It turns grey (not visible). Right-click again to bring it back. Do not guess hidden leg tips.
The whole fly is in the wrong place: hold Alt and drag any point. Turn the mouse wheel while dragging to rotate the fly.
A guess that is not a fly, or a fly guessed twice: click it and press Ctrl+Backspace.
A fly with no guess: Ctrl+I adds a new fly. Drag its points into place.
Do this for all 3 flies, then press Space for the next frame.
Zoom with the mouse wheel. Hold Alt and drag a box to zoom into it; Alt + double-click zooms out again. Drag with the left button to move the picture.
The female
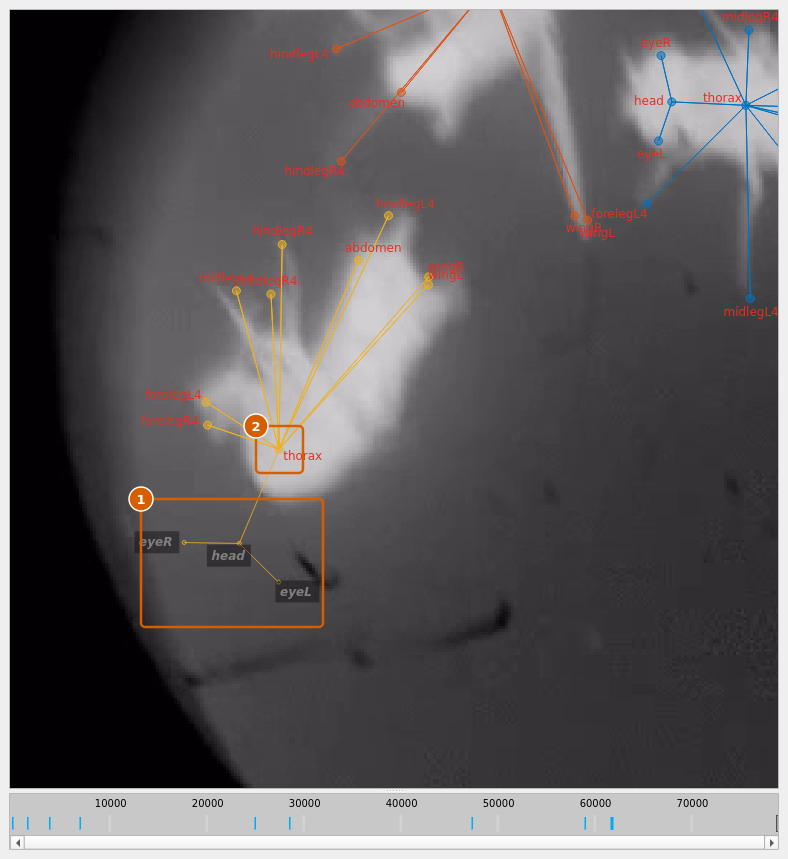
The female has no head. Still place head, eyeL and eyeR (1) where her head would be, in front of the thorax (2). Then right-click each of the three so they turn grey (not visible). Do not delete them. The wizard uses these three grey points to know which fly is the female.
Frame rules
Finish a frame or leave it alone. If you correct one fly, correct all three. A frame with labelled and guessed flies mixed is rejected.
Exactly 3 flies per frame. A fly that is out of the picture, or flies you cannot tell apart: skip the frame (press Space) and leave it as it is.
Every fly needs a thorax.
No points outside the image.
Never label one fly twice. Two labelled flies on top of each other are rejected.
The female must have grey head points. Otherwise the frame gets a warning and is merged only if Also merge frames with warnings is ticked.
When the frames come back, Check frames tests these rules (see Bring labelled frames back).
Saving and bringing the frames back
Save often with Ctrl+S. Saving writes into the package itself.
Do not use Save As, and do not rename or move
labels.pkg.slp. The wizard knows every frame by its pixels and rejects frames it did not send.When you are done: save, close SLEAP and bring the stick back. In the wizard choose Bring labelled frames back.
You do not have to finish in one go. Frames you skipped stay in the package; Continue labelling opens it again.
SLEAP keys
Key |
What it does |
|---|---|
Space / Shift+Space |
next / previous frame to label |
double-click a guess |
turns the guess into a labelled fly |
drag a point |
moves the point |
right-click a point |
not visible ↔ visible |
Alt + drag a point |
moves the whole fly (wheel: rotate) |
Ctrl+I |
adds a fly |
Ctrl+Backspace |
deletes the selected fly |
mouse wheel |
zoom |
Alt + double-click |
zoom out completely |
Ctrl+S |
save |
Command line
Everything in the windows can also be done in a terminal:
Command |
What it does |
|---|---|
|
the rig readiness check |
|
lists recording sessions |
|
the steps done for one session |
|
runs the steps of a session |
|
cuts a recording again |
|
analyses again with another model |
|
fetches the model list |
|
lists USB disks |
|
DrosoDB from a USB stick |
|
the Rig Relay steps on the rig |
|
the Rig Relay steps on the relay |
|
installs SLEAP for labelling |
|
shows or sets the default label set |
|
copies the default label set to Aoraki now |
|
adds the desktop icons |
rigconductor COMMAND --help lists the options of each command.
Keeping this manual up to date
The pictures are made by scripts/manual_screenshots.py and the PDF by
scripts/build_manual_pdf.py. After a window changes, run both again (see the
top of each script). The SLEAP pictures are made by
scripts/manual_sleap_screenshots.py; it runs with SLEAP’s own Python and a
labelled label set version.